


State management with GetX
GetX is a powerful and lightweight package in Flutter that provides a convenient way to manage state, handle dependency injection, and navigate between screens. It simplifies common tasks in Flutter development, making it more efficient and expressive. Let’s break down the main uses of GetX in simple terms:
1. State Management:
- In Flutter, managing the state (data and UI updates) of your app can become complex. GetX simplifies this process by providing a reactive state management system.
- With GetX, you can use the `GetXController` to define your app’s state. When the state changes, the associated widgets automatically update.
2. Dependency Injection:
- Dependency injection is a way to provide and manage the dependencies (services, controllers, etc.) your app needs. GetX has a built-in lightweight dependency injection system.
- You can easily inject dependencies into your controllers or services using `Get.put()` or access them directly using `Get.find()`
3. Navigation:
- GetX simplifies navigation between screens in your app. Instead of using `Navigator.push()` and `Navigator.pop()`, you can use `Get.to()` and `Get.back()`.
- GetX provides a simple and intuitive way to navigate between screens, and you can pass arguments between screens effortlessly.
4. Bindings:
- Bindings in GetX allow you to initialize controllers or services when a screen is created and dispose of them when the screen is destroyed. This helps manage resources efficiently.
- By extending `GetView` or `GetWidget`, you can easily bind your controllers and access them within the widget’s lifecycle.
5. Reactivity:
- Reactivity in GetX means that when the state changes, the associated widgets automatically rebuild to reflect the updated data.
- You can use `Obx` or `GetX` widgets to wrap parts of your UI that depend on reactive state. These widgets rebuild only when the observed data changes.
6. Internationalization (i18n):
- GetX provides simple tools for handling internationalization in your app. You can use the `GetMaterialApp` widget to easily set up and switch between different language translations.
7. Snackbars and Dialogs:
- GetX simplifies the process of showing snackbar messages and dialogs. You can use `Get.snackbar()` and `Get.dialog()` to display informative messages to the user.
Read more here: https://pub.dev/packages/get
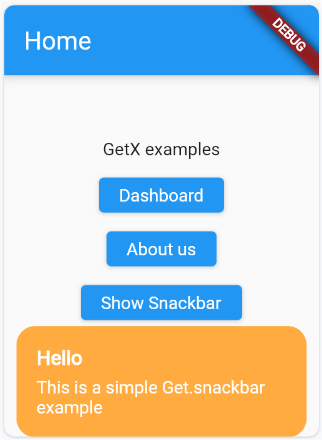
Navigation, dialog & snackbar example
The following example shows how to navigate from one screen and then comeback. It also shows how to use the snackbar and dialog functions.
import 'package:flutter/material.dart';
import 'package:get/get.dart';
import 'package:getx_nav/Aboutus.dart';
import 'package:getx_nav/Dashboard.dart';

void main() => runApp(GetMaterialApp(home: Home()));

class Home extends StatelessWidget {
  const Home({super.key});

  @override
  Widget build(BuildContext context) {
    return MaterialApp(
      home: Scaffold(
        appBar: AppBar(
          title: Text('Home'),
        ),
        body: Center(
          child: Column(mainAxisAlignment: MainAxisAlignment.center, children: [
            Text('GetX examples'),
            SizedBox(height: 15),
            ElevatedButton(
                onPressed: () {
                  Get.to(Dashboard());
                },
                child: Text('Dashboard')),
            SizedBox(height: 15),
            ElevatedButton(
                onPressed: () {
                  Get.to(Aboutus());
                },
                child: Text('About us')),
            SizedBox(height: 15),
            ElevatedButton(
              onPressed: () {
                // Show a snackbar when the button is pressed
                Get.snackbar(
                  'Hello',
                  'This is a simple Get.snackbar example',
                  snackPosition:
                      SnackPosition.BOTTOM, // Optional: Set the position
                  backgroundColor:
                      Colors.orangeAccent, // Optional: Set the background color
                  colorText: Colors.white, // Optional: Set the text color
                );
              },
              child: Text('Show Snackbar'),
            ),
            SizedBox(height: 15),
            ElevatedButton(
                onPressed: () {
                  // Show a dialog when the button is pressed
                  _showDialog();
                },
                child: Text('Show Dialog')),
          ]),
        ),
      ),
    );
  }

// Function to show a simple dialog
  void _showDialog() {
    Get.dialog(
      AlertDialog(
        title: Text('Hello Dialog'),
        content: Text('This is a simple dialog example.'),
        actions: [
          TextButton(
            onPressed: () {
              // Close the dialog when the "Close" button is pressed
              Get.back();
            },
            child: Text('Close'),
          ),
        ],
      ),
    );
  }
} |
 |
 |
 |
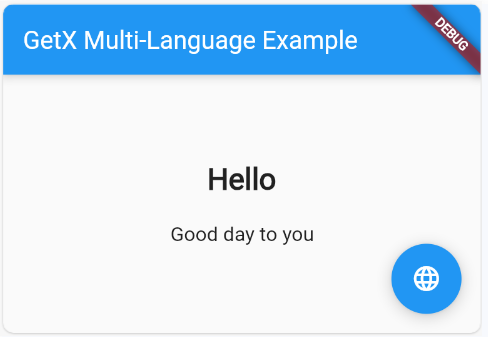
Multi language apps with translation support
This example has text from english and sinhalese lanuages. First we need to use the GetMaterialApp(), inside that we need to specify the file that contains the translation text, current locale and fallback locale (if a translation is not available for the device locale). The text is stored as key-value pair. You may use the Text() widget to display the translated text. Just use the ‘name’ followed by .tr to do the magic. Eg: Text(‘title’.tr) will display the correct translation as per the device for the key ‘title’. The following example uses FAB to switch between two locales. You may use other ways to support more than 2 languages.
import 'package:flutter/material.dart';
import 'package:get/get.dart';

void main() => runApp(GetMaterialApp(
    home: HomeScreen(),
    translations: MyTranslations(),
    locale: Locale('en', 'US'),
    fallbackLocale: Locale('en', 'US')));

class MyTranslations extends Translations {
  @override
  Map<String, Map<String, String>> get keys => {
        'en_US': {
          'title': 'Hello',
          'greet': 'Good day to you',
        },
        'si_LK': {
          'title': 'හලෝ',
          'greet': 'ඔබට සුබ දවසක්',
        },
      };
}

class HomeScreen extends StatelessWidget {
  @override
  Widget build(BuildContext context) {
    return Scaffold(
      appBar: AppBar(
        title: Text('GetX Multi-Language Example'),
      ),
      body: Center(
        child: Column(
          mainAxisAlignment: MainAxisAlignment.center,
          children: [
            Text(
              'title'.tr,
              style: TextStyle(fontSize: 24, fontWeight: FontWeight.bold),
            ),
            SizedBox(height: 20),
            Text(
              'greet'.tr,
              textAlign: TextAlign.center,
              style: TextStyle(fontSize: 16),
            ),
          ],
        ),
      ),
      floatingActionButton: FloatingActionButton(
        onPressed: () {
          // Toggle between English and Spanish
          Get.updateLocale(Get.locale == Locale('en', 'US')
              ? Locale('si', 'LK')
              : Locale('en', 'US'));
        },
        child: Icon(Icons.language),
      ),
    );
  }
} |
 |
More information:
- Language codes: https://en.wikipedia.org/wiki/List_of_ISO_639_language_codes
- Country codes: https://en.wikipedia.org/wiki/ISO_3166-1
Complete project to learn the basics
